Key Takeaways
- The hiking gear you need changes completely depending on trail difficulty and season. Rather than buying a “beginner’s full kit” all at once from a store, it’s cheaper and more effective to build your gear list around the specific trail you’re planning to hike.
- As a baseline, backpack capacity should be 20-30L for day hikes, 35-45L for overnight trips, and 50-65L for trips of two nights or more. Total pack weight shouldn’t exceed 15-20% of your body weight if you want your knees to hold up on the way down.
- Hiking boots fall into three categories—light, mid-weight, and winter—and the real question isn’t “where am I going” but “how much ankle support do I need, and do I need waterproofing.” Framing it this way cuts down on buying mistakes significantly.
- Beginners often spend so much time picking out clothes and shoes that they completely forget emergency gear like a sleeping bag, headlamp, or portable charger. This is exactly where accidents tend to happen.
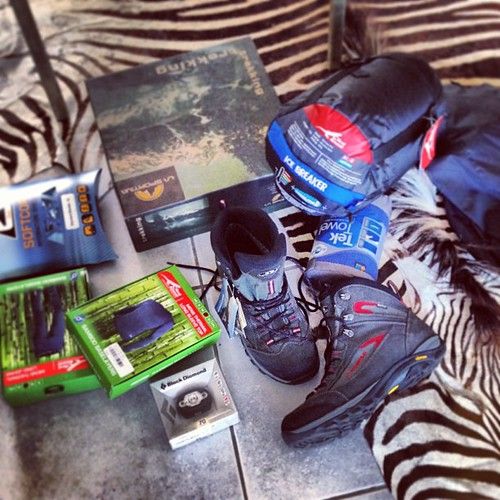
Why does the gear you need change from trail to trail?
Someone taking a two-hour walk around a low ridge trail who shows up with a pack sized for a multi-day traverse will end up repacking their bag before they’ve even gone 3km, their shoulders already aching. On the flip side, someone attempting a day trip to a high peak wearing summer boots and a t-shirt will get hit hard by the sudden drop in wind chill near the summit. Gear needs to match the trail—packing something “just in case” or skipping something because “I probably won’t need it” both lead to trouble.
In practice, the fastest way to build a checklist is to organize hiking gear into three layers.
- Clothing system: base layer (moisture-wicking) – mid layer (insulation) – outer shell (wind/waterproof), the classic three-layer system
- Hardware: boots, backpack, trekking poles, headlamp
- Consumables and safety gear: first-aid kit, portable charger, map/compass or offline map apps
If you skip an entire layer, the risk grows exponentially the longer the trail is. The third layer especially—first-aid kits, portable chargers—often gets left out entirely because “it’s just a day hike.” But according to annual distress-incident statistics from Korea’s national park authorities, more than half of all incidents happen on short trails under three hours, and specifically involve delayed descents after 2pm. The hike you thought would be “quick and easy” is exactly where the real danger lies.
What are the five essentials for even a short day hike?
Even for a short 2-3 hour trail, these five items should stay in your pack.
- Hiking boots: Sneaker soles slip right off on wet dirt or fallen leaves during the descent. A single pair of shoes with ankle support prevents a large share of ankle-twisting injuries.
- 20-30L backpack: The minimum capacity that fits a spare layer, emergency food, and rain gear without straining your shoulders.
- 1-2 trekking poles: They noticeably reduce the impact on your knee joints, especially on the way down. This is roughly the consensus among experienced hikers.
- Windbreaker jacket: Summit temperatures are often 5-10°C lower than at the trailhead. Add wind on top of that, and the chill factor drops even further.
- Headlamp: The moment you think “surely it won’t get dark that fast,” it will. In fall and winter especially, mountain areas can go dark surprisingly quickly around 5pm.
Add at least 1.5L of water, quick-energy emergency snacks like chocolate bars or nuts, and a portable phone charger, and you’ve got the basic day-hike kit. Even with all six or seven items packed, a 20L bag will have plenty of room to spare.
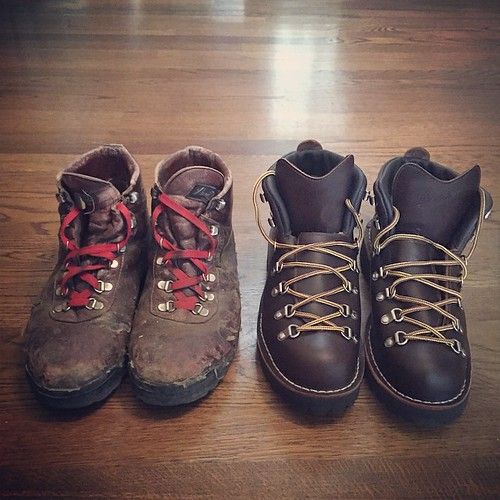
What’s the actual difference between types of hiking boots and poles?
If you shop for boots by price alone, chances are you’ll end up buying a second pair. A classic example: someone buys a $40 pair of light hiking boots, sets off on a multi-day traverse, and gives up midway because their ankles are throbbing. Breaking boots down this way makes the choice much easier:
- Light hiking boots: 400-600g, minimal ankle support, best for low ridge trails, small hills, and 2-3 hour outings
- Mid-weight hiking boots: 700-900g, ankle-covering structure, suited for ridge traverses or trails over 5 hours
- Winter hiking boots: Enhanced waterproofing and insulation, with a Vibram sole built to attach crampons. From December through February, snow-covered mountains will soak your feet without these.
Trekking poles split by material in a similar way. Aluminum poles cost around $15-30 each and rarely snap even against rocks, but at roughly 400g per pair, they’re heavier than carbon poles. Carbon poles weigh in around 250g, making them lighter, but they can snap if wedged in rock crevices or under lateral force—putting them at a disadvantage on rough rocky terrain. If you hike about once a month, aluminum is the safer starting choice.
The most common mistake is wearing brand-new boots straight into a multi-day trek without breaking them in first. Walking 10-20km on a neighborhood trail or riverside path first, checking for pressure points on your toes, and only then heading out for a serious hike is the surest way to avoid blisters.
What backpack capacity should you actually buy?
It seems like bigger would always be better, but in reality, a larger pack just tempts you to stuff in things you don’t need. Load day-hike gear into a 60L pack and the contents shift around inside as you walk, throwing off your balance—ironically making the hike harder than if you’d used a 20L bag. It’s far more efficient to size your pack based on your trip length.
- Day hike: 20-30L
- Overnight trip: 35-45L
- Multi-day traverse (2 nights+): 50-65L
- Extended backpacking: 65L+
There’s one more benchmark that’s easy to overlook: total pack weight shouldn’t exceed 15-20% of your body weight—this is the practical guideline for protecting your knees and lower back. For someone weighing 70kg, that’s roughly 10.5-14kg; for 60kg, around 9-12kg. Considering that 1.5L of water alone weighs 1.5kg, you’ll likely find there’s more room to trim your pack than you’d expect.
What safety gear do beginners most often forget?
People will pore over online reviews to carefully pick out clothes and shoes, yet skip gear that’s directly tied to their safety, thinking “surely I won’t need that.” The items below are especially easy to overlook on day hikes.
- Emergency foil blanket (survival blanket): Weighing around 100g and costing just a few dollars, this cheap item makes a huge difference once your body temperature starts dropping. It’s especially useful if you’ve twisted an ankle and have to sit still for a long stretch.
- First-aid kit: Just bandages, antiseptic wipes, painkillers, and a compression bandage are enough to handle most scrapes and ankle injuries.
- Offline map downloads: Mid-mountain areas, especially near valleys, frequently have zero signal. Get in the habit of downloading offline maps before you set out.
- Extra pair of socks: Once your feet get wet, you’ll be walking for hours in damp socks, raising the risk of both blisters and hypothermia at the same time.
It’s also common for hikers to rely entirely on their phone battery, skip the portable charger, and then spend the entire descent anxious as their battery drops below 30% while running a map app. A portable charger weighing around 200g is one of the best gear investments per gram of weight.
Is there gear you absolutely need to add by season?
Building on top of your basic day-hike kit with seasonal add-ons keeps you from buying duplicate gear.
- Spring and fall: With morning-to-evening temperature swings often exceeding 10°C, add a mid-layer like fleece or a lightweight puffer.
- Summer: A well-ventilated jacket, insect repellent (essential during tick season in July-August), and a spare T-shirt to change into once you’ve sweated through the first one.
- Winter: Crampons, gaiters, an insulated water bottle, warm gloves, and heated insoles. Skip even one of these five and your winter hike gets noticeably harder.
The same pattern of accidents repeats every year: hikers crossing icy patches without crampons and slipping. Trails are actually more slippery during the freeze-thaw cycles of late November to early December and late February to early March than during the depths of winter when snow stays consistently packed. Thinking “it hasn’t snowed that much yet, so I should be fine” is precisely when the danger is highest.
What matters more than buying gear?
You don’t need a full set of gear from day one. Items that need to fit your body directly—boots and backpacks—are worth buying outright, but gear whose usefulness depends on season or trail type, like trekking poles or crampons, is more realistically sourced through gear rental services or secondhand listings in local hiking communities. Crampons, in particular, often get used just two or three times a season before going back into storage. The smarter approach, both cost-wise and satisfaction-wise, is to hike a few times, figure out whether you’re more of a day-hiker or a multi-day traverse type, and then expand your gear from there.
Frequently Asked Questions
What should I prioritize when building my first set of hiking gear?
Start with hiking boots, which need to fit your feet, and a backpack, which needs to fit your body. Fill in consumable items like trekking poles or a headlamp afterward. Since ill-fitting boots or a backpack make the entire hike uncomfortable, it’s better to buy these two outright rather than rent them.
Should I always buy the largest backpack capacity available?
Not necessarily. A larger capacity tempts you to overpack, adding unnecessary weight, and loose gear shifting inside the bag can actually make walking harder. It’s better to choose capacity based on your trip length—20-30L for day hikes, 35-45L for overnight trips.
Should I buy light hiking boots or mid-weight hiking boots?
If you mostly stick to low ridge trails, small hills, or trips under 2-3 hours, light hiking boots are sufficient. But if you frequently tackle ridge traverses or rocky trails lasting over 5 hours, mid-weight boots with ankle support are far better for preventing injury.
Do I need cold-weather gear even in summer?
Yes. Summit temperatures can run 5-10°C cooler than the trailhead, and getting caught in rain can drop your body temperature quickly, so it’s safest to pack a lightweight windbreaker even in summer.
Is there a way for beginners to start hiking without buying everything up front?
Buy boots and a backpack outright, but for gear you’ll use less often, like crampons or trekking poles, renting from an outdoor gear rental service or buying secondhand can significantly cut your upfront costs.